Getting Started with Usenet
Published
I’ve discussed the topic of Usenet and downloading NZB files with several friends, but the reality is, I had to figure it all out on my own years ago.
I’ve decided to write this guide to help friends and strangers get started on media automation with their servers and machines.
I also want to note that the software and indexers I’m going to mention are purely my personal preferences through years of experimentation and reliability testing. You’re free to use your own — this is just a tried-and-true setup for beginners.
Disclaimer: I accept no responsibility for any questionable or illegal content being discussed or transferred.
This is simply a guide on how to accomplish media automation — use this at your own risk and discretion.
Price: Free to $xx Time: ~30 min – 1 hour
Almost all Usenet providers require a paid subscription, since they act as your ISP for Usenet servers and are responsible for retaining vast amounts of files and binaries for several years. However, many offer a trial period with conditions (such as a 14-day window or a daily download limit).
Info: Bottom line: indexers (which help you find files) can be free, but Usenet providers are not. They will be your core investment.
Software Needed
Usenet Subscription
A short list of recommended providers — you only need one. Listed in order from most to least preferred. Prices vary and trials may be available.
- UsenetServer
- Newshosting
- GigaNews
- NewsDemon
Download Client
- Sabnzbd
Automation Software
- TV Shows: Sonarr
- Movies: Radarr
- Music: Lidarr
Indexers
You only need one, but you can use multiple to cast a wider net.
Paid:
- NZBGeek
- DrunkenSlug
- NZBplanet
- Dognzb
- SimplyNZBs
Free:
- NZBindex
- NZBPlanet (free tier)
Step 1 – Usenet Provider
The good news is that many Usenet providers run flash sales or promotions, especially during holidays. In my own case, I snagged a $3/month deal with UsenetServer during a Labor Day sale, and I’ve been grandfathered into that price ever since.
You simply pay for a plan, and from that point forward you only need your login credentials (username and password).
Step 2 – Download Client
In this guide we’ll focus on Sabnzbd. I find it more straightforward and hassle-free than NZBGet.
Just navigate to their webpage and download for your platform. In the Windows environment, most of these tools offer the option to install as a service — I suggest you do that for full automation.
Warning: I do not recommend Debian for this entire setup.
0/10 would not recommend.
Once Sabnzbd is installed, it runs through a web interface accessible at:
http://127.0.0.1:8080/sabnzbd/Step 3 – Set Up Your Folders
Create a parent folder called NZB wherever you’d like. It will be a central holding place for your files. Inside it, create three subfolders:
CompletedIncompleteWatched
Tip: If you store all your media on a single hard drive, keep the NZB folder on the same drive to reduce or eliminate delay when transferring files.
Next, create your main media folders — for example, TV Shows and Movies.
\harddrive\media\TV Shows\
\harddrive\media\Movies\
Once your folders are created, open Sabnzbd in your browser. Click the gear icon (top right) for Sabnzbd Config, then navigate to the Folders tab. Under “User Folders”, update the paths for your Temporary (incomplete), Completed, and Watched folders. Click Browse to navigate to each, then Save.
Most importantly — save your changes.
Step 4 – Configure Sabnzbd
Now that you’ve signed up with a Usenet provider, fill in the connection details so Sabnzbd knows how to talk to their servers.
When you sign up, your provider gives you connection details — sometimes easy to find, sometimes buried in Support. For UsenetServer, for example, the host address is NEWS.USENETSERVER.COM and the ports are 119 (unencrypted) and 563 (SSL).
Use the SSL port. Unencrypted is not recommended.
In Sabnzbd Config, go to the Servers tab → Add Server:
- Enable it
- Enter the host address
- Enter your username and password
- Set Connections to whatever your plan advertises (e.g. 15). If you see errors during downloads, lower this number.
Test the server — if it passes, save.
Step 5 – Download Sonarr / Radarr
We’ll start with TV and movies. The same setup applies to Radarr and Lidarr, since they’re forks of Sonarr.
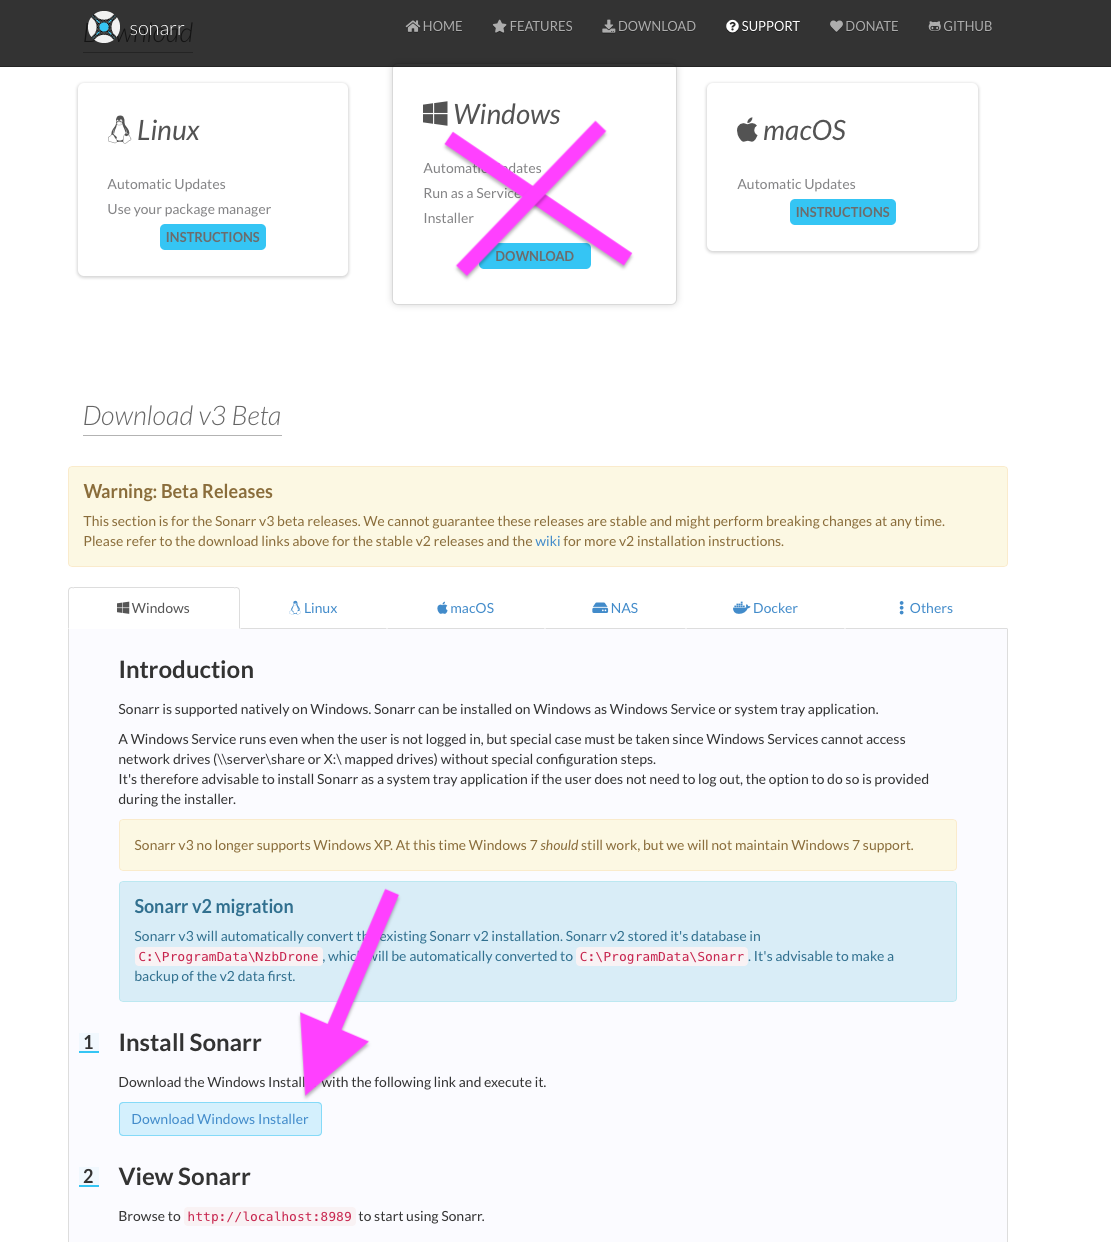
Focus on the latest release (v3). I find it much cleaner than the stable default — and it supports advanced filtering, like narrowing releases by string (e.g. filtering for AMAZON in a release name).
After installing, Sonarr opens at:
http://127.0.0.1:8989Step 6 – Setting Up Sonarr
In Sonarr, go to Settings → Download Clients, then click the + to add a new client.
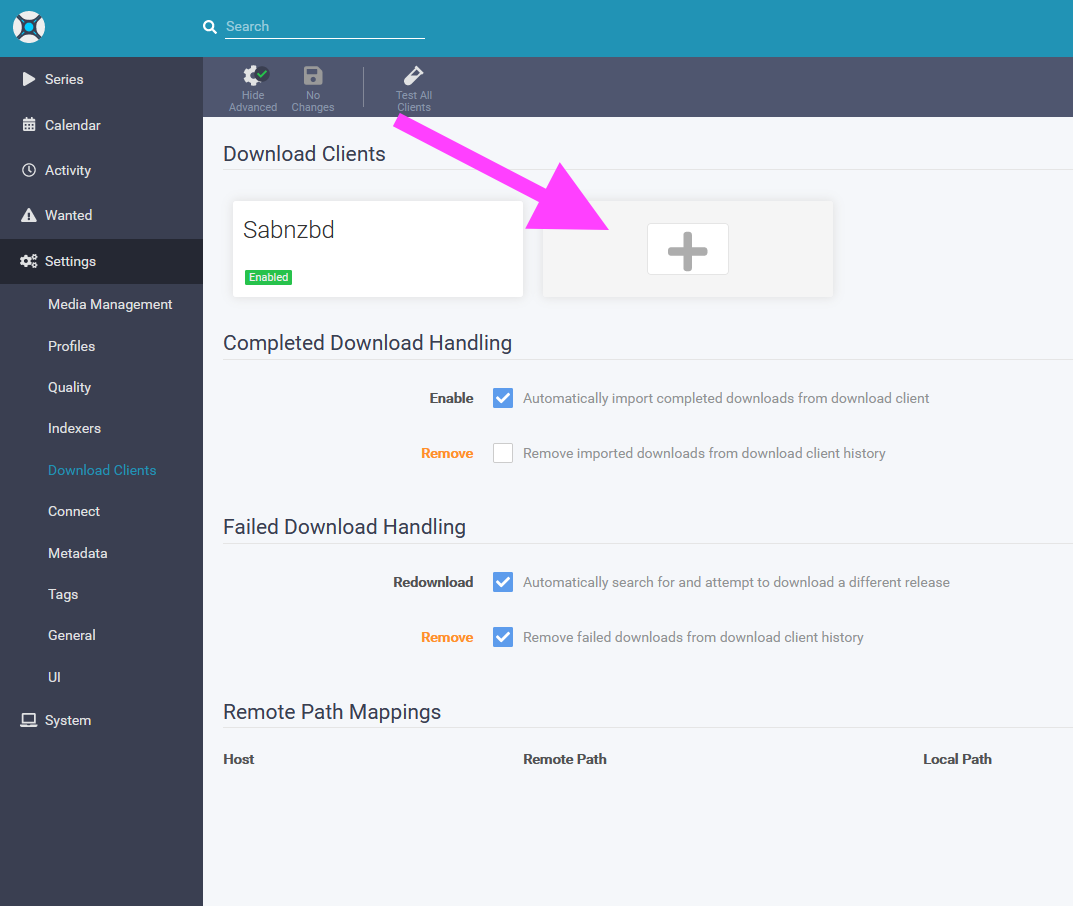
Select Sabnzbd, then fill in the connection details.
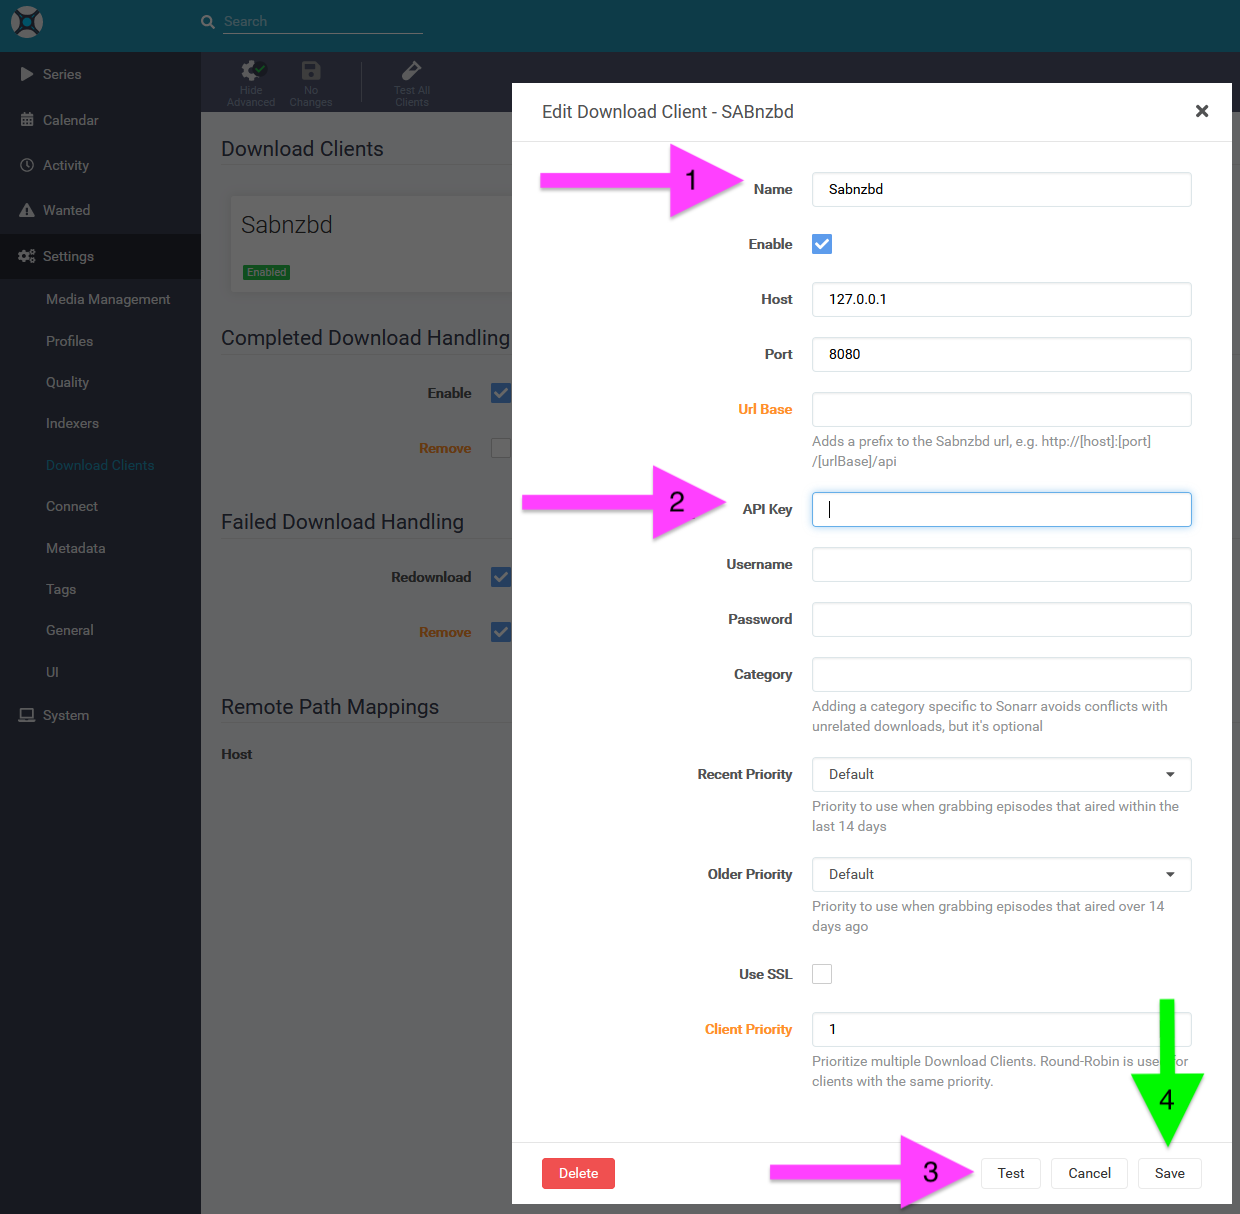
- Host:
127.0.0.1orlocalhost(if Sabnzbd is on the same machine) - API Key: found in Sabnzbd Config → General tab → Security section. Copy it and paste it here.
Click Test — if it passes, click Save.
 Sonarr can now communicate with Sabnzbd and control all downloads in and out of it.
When a download completes, Sonarr automatically pulls it from your Completed folder and places it into the correct show/season directory. Automation!
Step 6 – Indexers for Sonarr / Radarr
If you’ve signed up with an indexer, they’ll give you an API key through your account profile. In this example we’ll use NZBGeek.
In Sonarr, go to Settings → Indexers and click the + to add one.
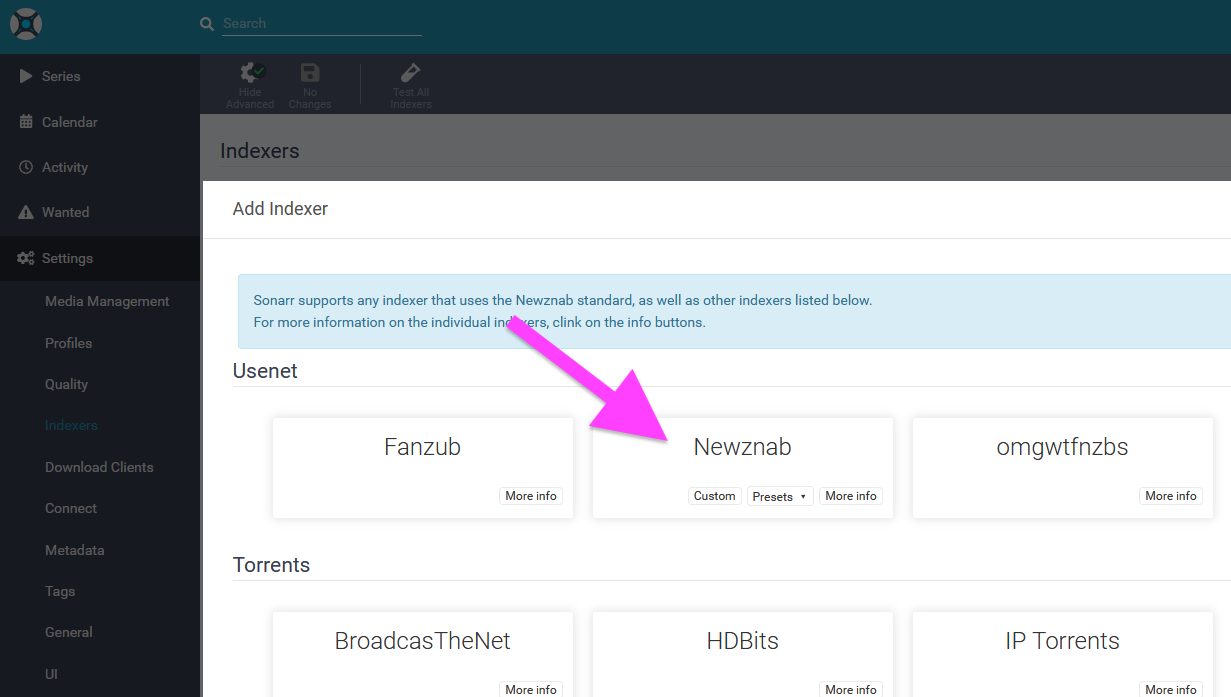
Click Newznab — this is the broad category that covers NZBGeek and most other indexers.
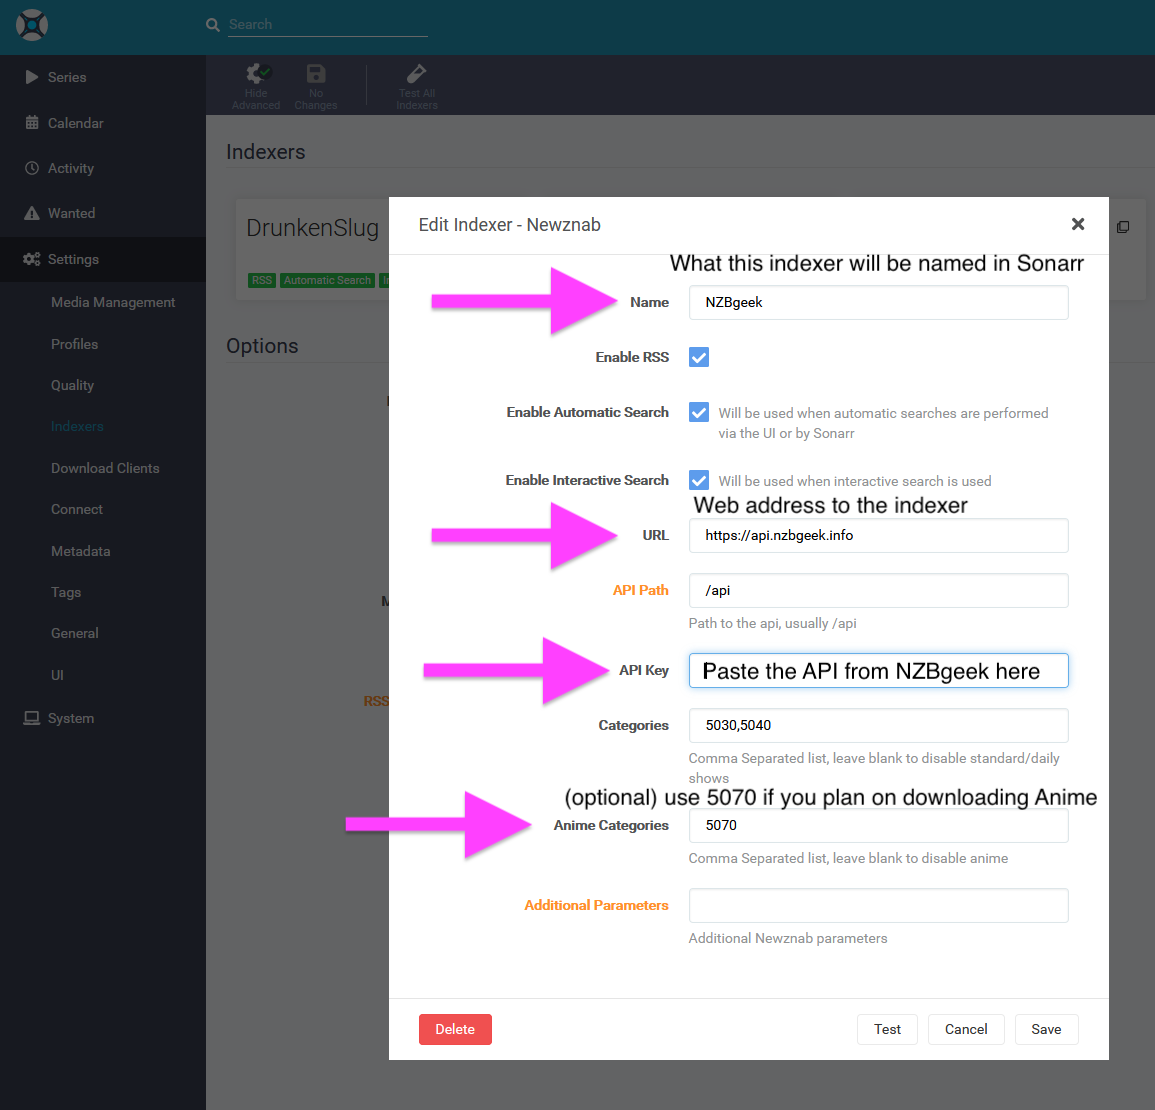
- Name: whatever the indexer is called
- URL: shown on your indexer’s account/profile page
- API Key: paste from your indexer account
- Anime categories: leave blank unless you plan to download anime — if so, add
5070
Click Test, then Save.
Step 7 – TV Show / Movie Folder Setup
Go to Settings → Media Management, scroll to the bottom, and add your root folders under Root Folders.
You don’t need to create folders for individual shows — Sonarr handles that automatically as long as you point it to the correct root folder.
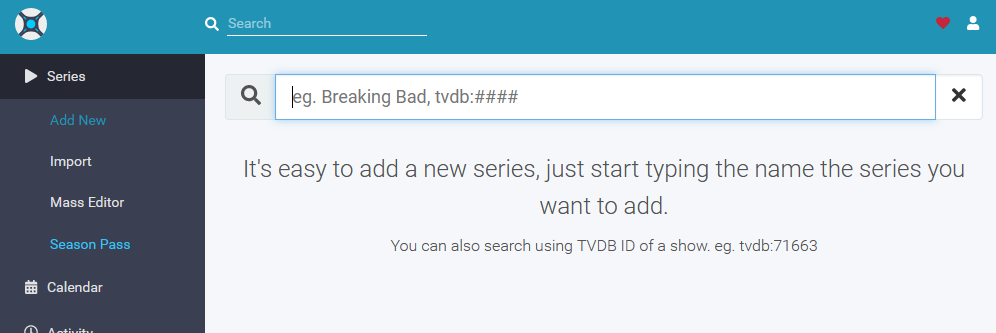
Step 8 – Start Adding Things!
Note: Sonarr can also scan your existing folders for TV shows you already have and import them into your library.
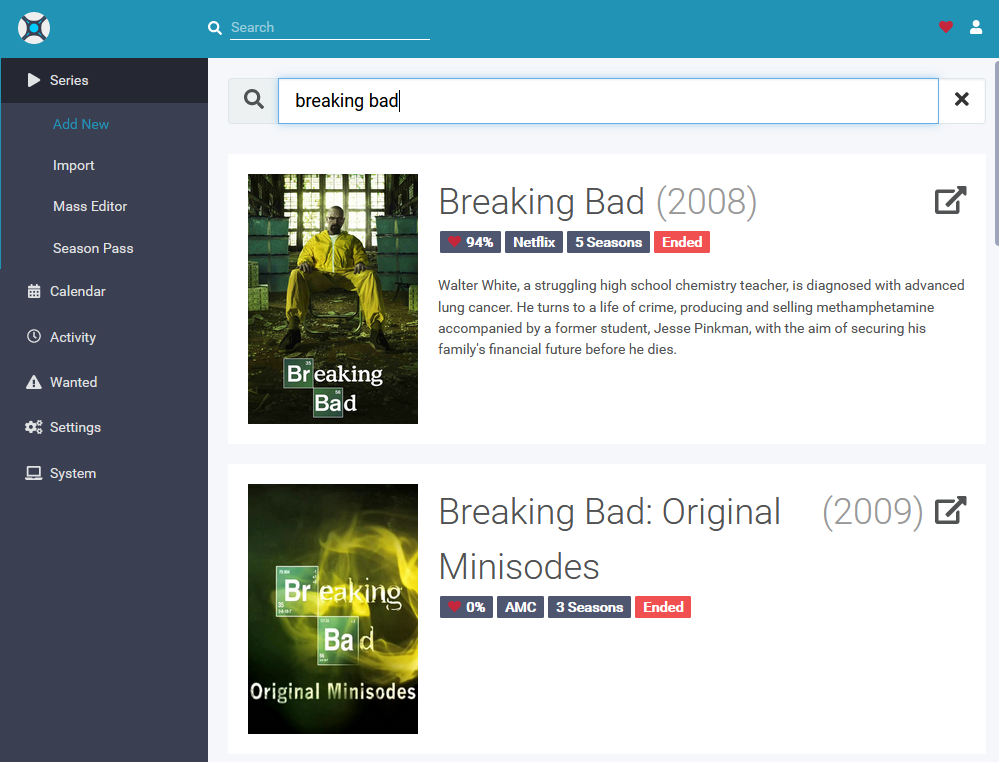
Go to Series → Add New. Searching for Breaking Bad, for example:
Click the result to set details before adding it to your library.
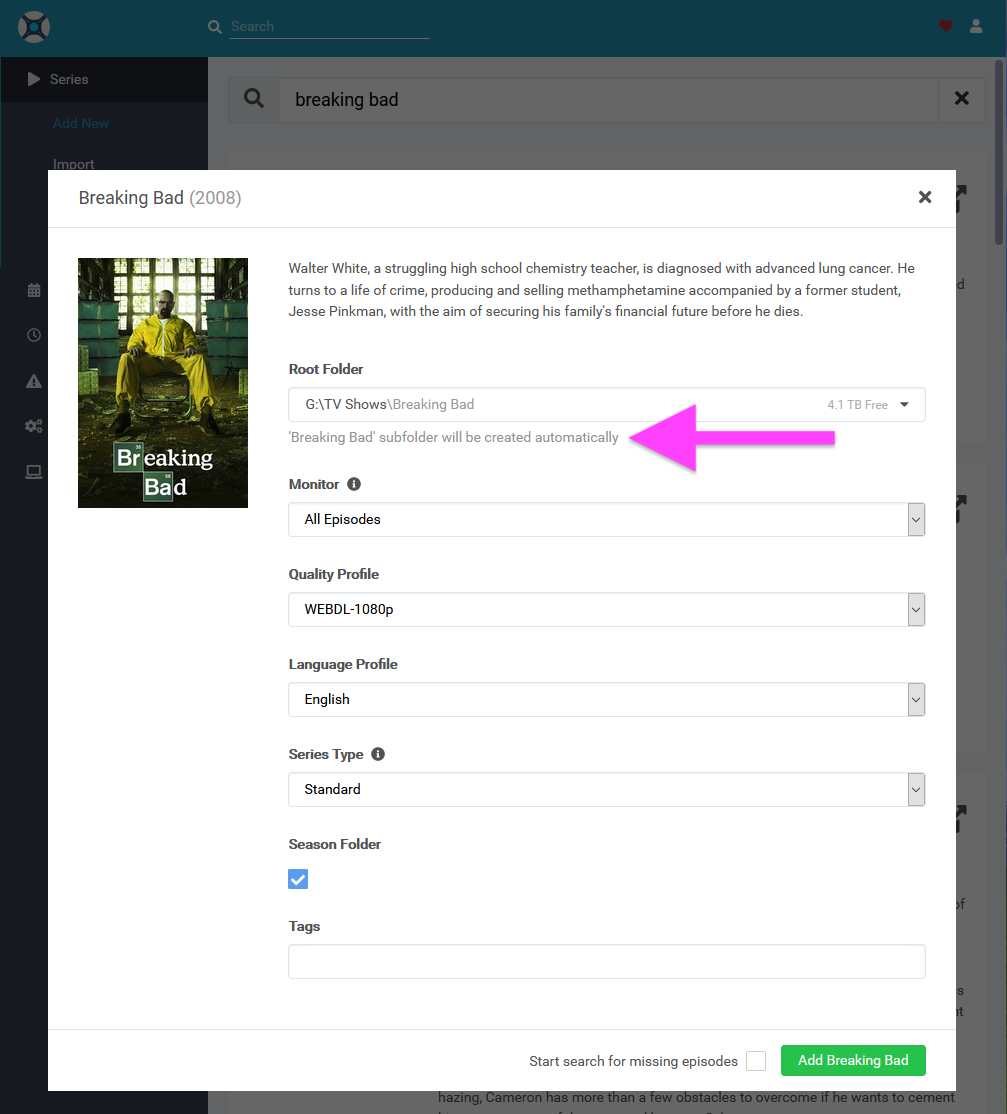
Sonarr will create the folder structure automatically, including Season folders if that option is checked.
Once added, click the show to open its page:
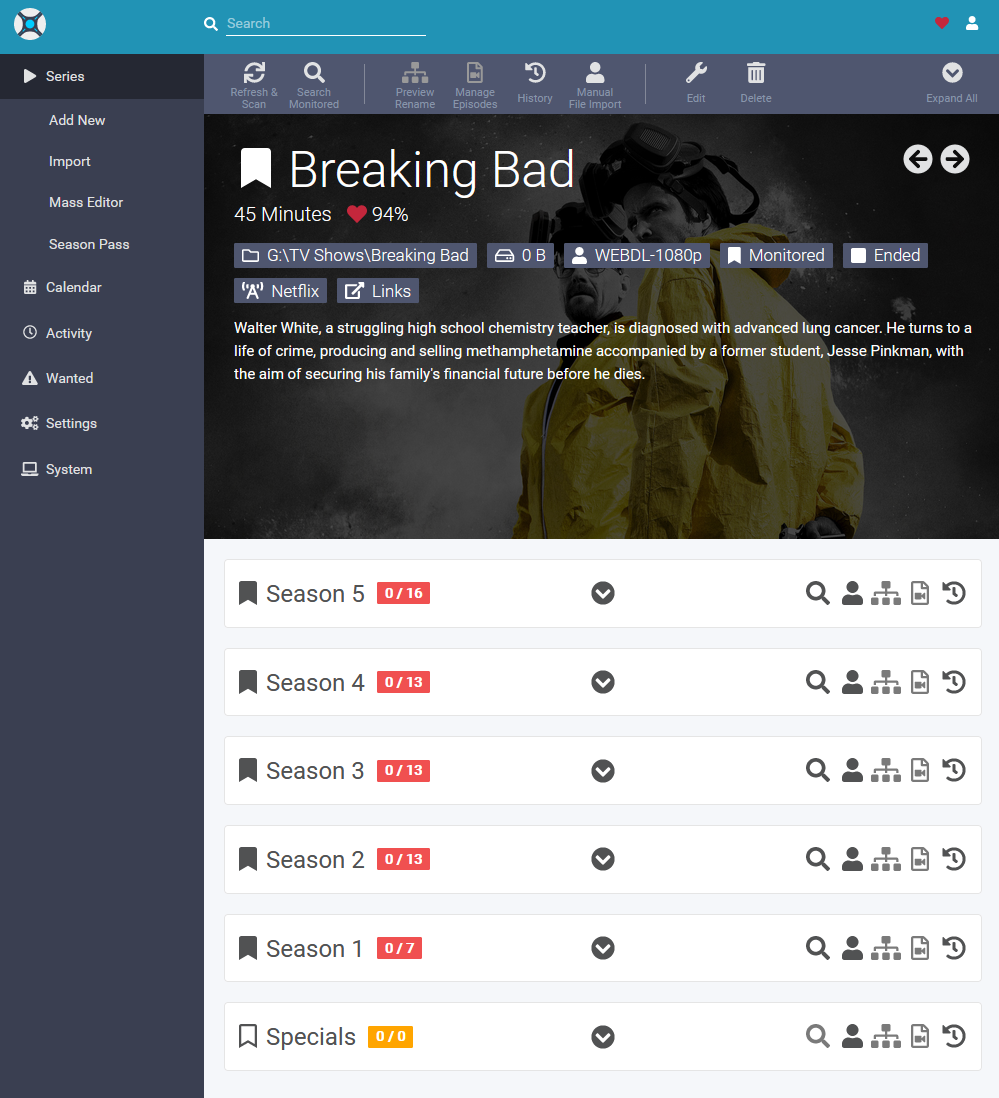
- Search Monitored — scans for every missing episode at once
- Click the search icon next to a season to search by season
- Expand a season to search individual episodes
If you’re picky about release groups, you can manually search and pick from available releases. Red ! indicators just mean the release doesn’t match your preferred quality profile — you can still force-download anything.
Note: If you download an episode where one already exists, it will simply replace the existing file.
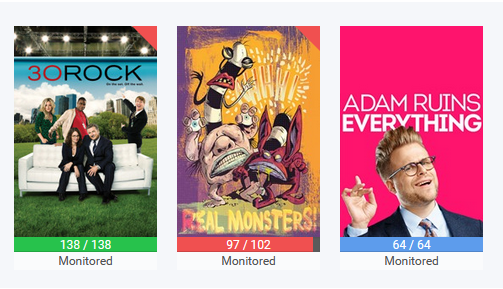
Sonarr also tracks air dates for shows still airing:
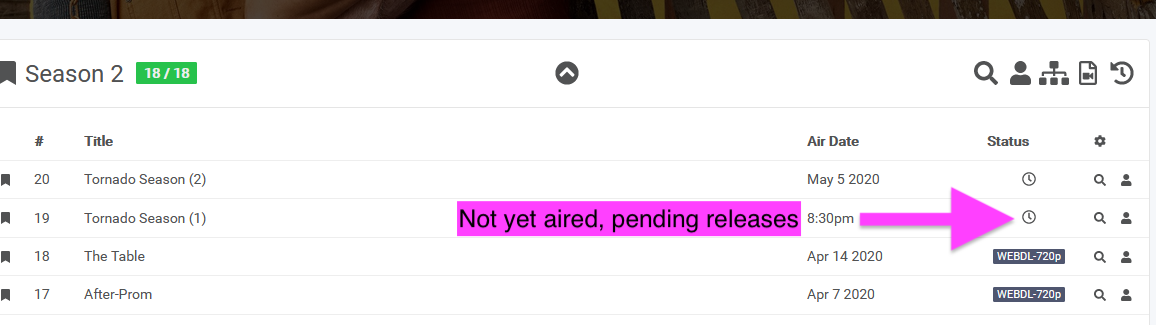
Once you have shows in your library, colored bars indicate status:
- Green: Show has ended, all episodes accounted for
- Red: Episodes are missing
- Blue: Show is still airing, but all episodes so far are accounted for
After queueing downloads, Sabnzbd handles the rest. When complete, Sonarr moves everything to the right folder automatically.
Bonus: Adjusting Download Speeds
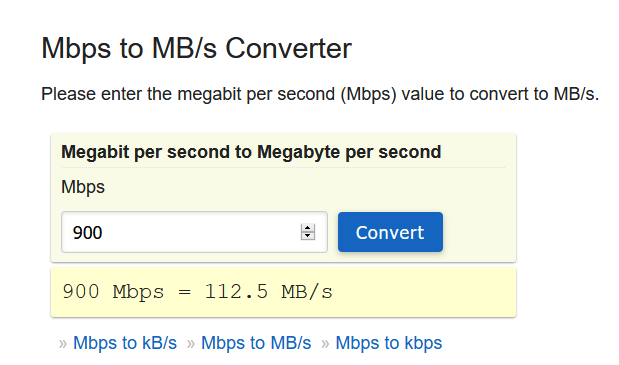
To set a speed cap, first figure out your internet speed in MB/s (not Mbps). Use an online Mbps → MB/s calculator. For example, 900 Mbps ≈ 112 MB/s.
In Sabnzbd Config → General → Tuning, set Maximum line speed to your calculated value, then save.
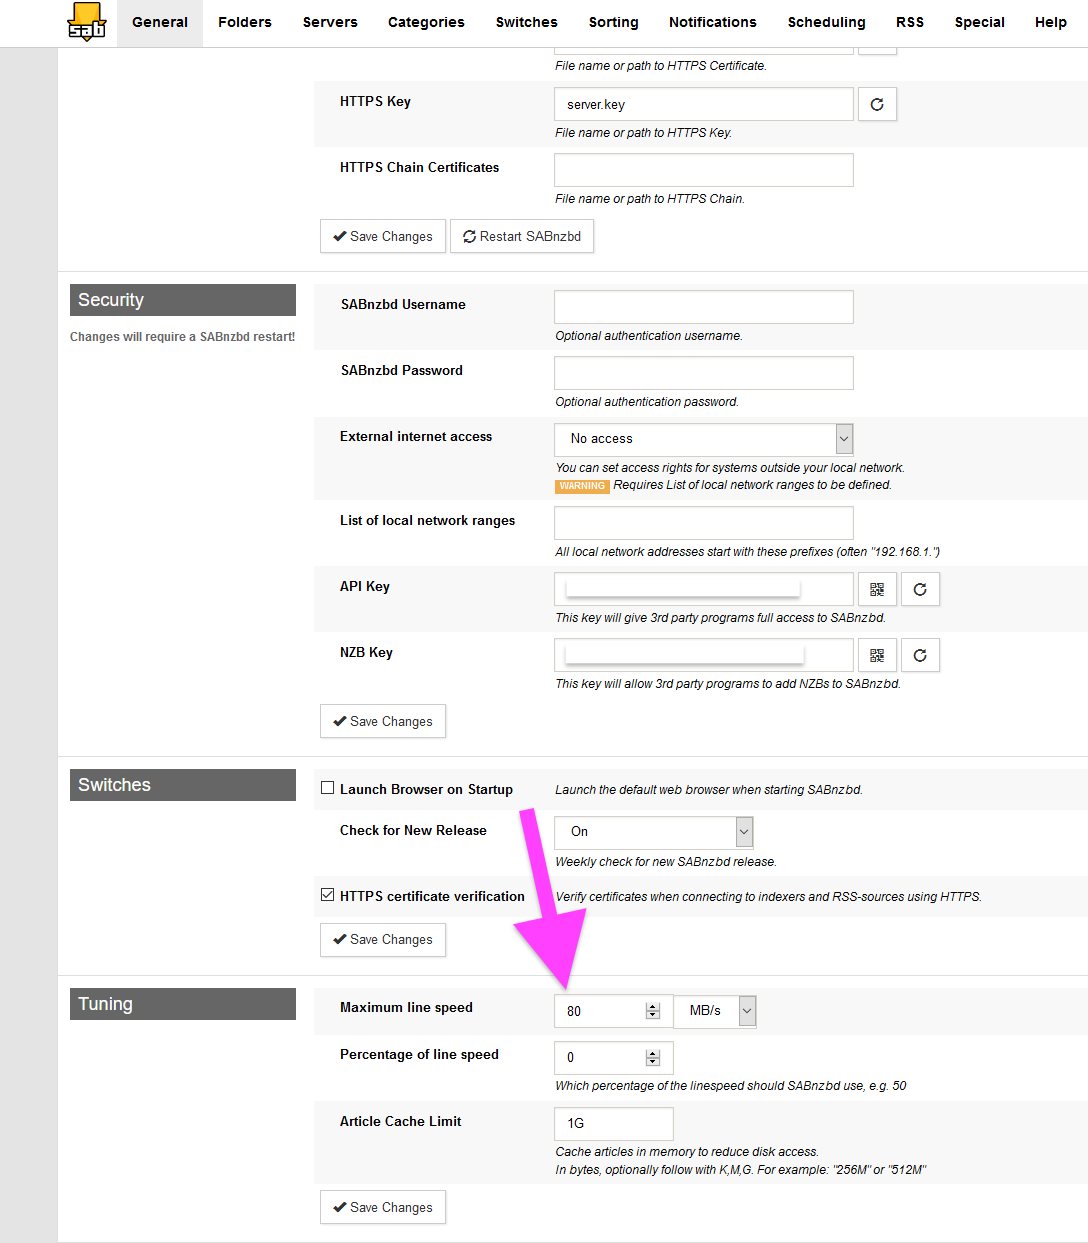
Back on the Sabnzbd main page, you’ll now have a slider to cap your download rate — useful if you need bandwidth headroom for other things running simultaneously.